
[Scenography] 2D
hills for historic 15mm wargames

Para poder jugar a wargames de temática histórica a 15mm, como por ejemplo DBMM, no se pueden utilizar escenografía de terrenos con excesiva altura, o de 3D.
Si colocamos una colina de las usadas para juegos de 28mm,
corremos el peligro que al colocar las minis en las pendientes, una posición
estratégica por excelencia, la plaqueta de las miniaturas, muy estrechas, no
tengan un centro de gravedad claro y estos caigan irremisiblemente.
Estos juegos suelen ser representativos;
esto quiere decir que una plaqueta con 4 miniaturas realmente representan entre
80 y 120 soldados.
Y aprovechando este concepto, lo idóneo es realizar
escenografía también representativa.
Para ello he optado por crear escenografía 2D (o sea, sin
altura)
Y he empezado por hacer colinas.
To be able to
play historical-theme wargames at 15mm, such as DBMM, you can not use terrain
with excessive height, or 3D.
If we place a hill of those used for 28mm games, we run the risk of placing the minis on the slopes, a strategic position par excellence, the platelet of the miniatures, very narrow, do not have a clear center of gravity and these fall irremissibly .
If we place a hill of those used for 28mm games, we run the risk of placing the minis on the slopes, a strategic position par excellence, the platelet of the miniatures, very narrow, do not have a clear center of gravity and these fall irremissibly .
These games are
usually representative; this means that a plate with 4 miniatures really
represents between 80 and 120 soldiers.
And taking advantage of this concept, the ideal thing is to make a set design that is also representative.
For this I have chosen to create 2D scenery (that is, without height)
And I started by making hills.
And taking advantage of this concept, the ideal thing is to make a set design that is also representative.
For this I have chosen to create 2D scenery (that is, without height)
And I started by making hills.
Materiales - Materials
Para realizar este tipo de escenografía es muy importante
escoger un material que no sea grueso, para evitar el “escalón” que puede
generar el material utilizado, cosa que haría que la plaqueta con las
miniaturas caiga, que es justamente el objetivo contrario motivo de la
realización de esta escenografía.
Inicialmente he optado por dos materiales: una lámina de
plástico y otra de Goma Eva.
To make this type
of scenography it is very important to choose a material that is not thick, to
avoid the "step" that can generate the material used, which would
cause the platelet with the miniatures to fall, which is precisely the opposite
objective motive of the realization of this scenography.
Initially I opted for two materials: a sheet of plastic and another of Rubber Eva.
Initially I opted for two materials: a sheet of plastic and another of Rubber Eva.

El motivo de usar este tipo de material es porque no queremos
que al poner la textura encima, este se curve por la humedad de la masilla,
como suele pasar con cartones finos. Y usar maderas que no se comben con la
humedad, nos obliga a coger espesores demasiado gruesos, que no nos interesa.
Como el soporte es un material flexible y fino, debemos
escoger una masilla para texturar que sea a la vez flexible.
Si utilizamos escayola o yeso mezclada con arena fina sobre
este soporte flexible, para dar textura, al secar se agrietaría y saltaría
(esto se llama experiencia o “me acaba de pasar a mi”).
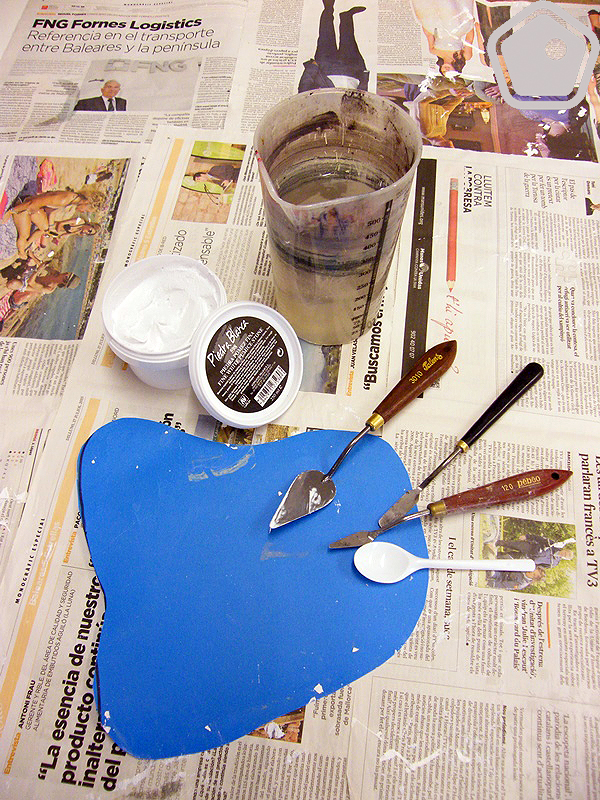
Por ello he optado por masilla acrílica de Vallejo.
Aconsejo utilizar “Piedra Pómez Blanca”. Esta la tenemos en
el bote transparente de 200 mi que podemos encontrar en las tiendas de
maquetismo o, el mismo producto pero en tarrina de 250ml, que se vende en
tiendas de bellas artes, de la gama “Piedra Blanca”, algo más económico que el
primero.
Y es el mismo producto.
The reason for
using this type of material is because we do not want to put the texture on
top, this is curved by the moisture of the putty, as usually happens with thin
cartons. And using woods that do not bind with moisture, forces us to take
thicknesses too thick, which does not interest us.
As the support is
a flexible and thin material, we must choose a texture putty that is both
flexible.
If we use plaster or plaster mixed with fine sand on this flexible support, to give texture, on drying it would crack and jump (this is called experience or "just happened to me").
That is why I have opted for Vallejo acrylic putty.
I advise using "Piedra Pómez Blanca". This we have in the transparent 200 ml can that can be found in the shops of model making or the same product but in a 250ml tub, which is sold in fine arts stores, in the "Piedra Blanca" range, which is cheaper than first.
And it's the same product.

Las ventajas de este producto son:
- Una vez seco es flexible, justamente lo que estoy buscando
- Al ser acrílico, podemos rebajar con agua la masilla, por
lo que podemos expandirlo obteniendo más o menos textura, al gusto
- Al añadir agua, conseguimos tener más masilla para utilizar
en más escenografía.
- Podemos limpiar todas las herramientas simplemente con
agua.
- Una vez seca la masilla, podemos retirar fácilmente de la
mesa, las manos,…
Para poder trabajar esta escenografía también necesitamos
unas espátulas, para expandir el material sobre el soporte.
Yo utilizo las de bellas artes, que son pequeñas de
diferentes tamaños, y no demasiado caras.
La versión más económica sería una cucharita desechable.
The advantages of
this product are:
- Once dry it's flexible, just what I'm looking for
- Being acrylic, we can reduce the putty with water, so we can expand it getting more or less texture, to taste
- By adding water, we have more putty to use in more scenery.
- We can clean all the tools simply with water.
- Once dry putty, we can easily remove from the table, hands, ...
To be able to
work this set design we also need some spatulas, to expand the material on the
support.
I use fine arts, which are small in different sizes, and not too expensive.
The most economical version would be a disposable teaspoon.
I use fine arts, which are small in different sizes, and not too expensive.
The most economical version would be a disposable teaspoon.
Creando las colinas -
Creating the hills
Lo primero que debemos hacer, es cortar las piezas de plástico
o de Goma Eva, con las formas que deseemos.
Después expandimos la masilla sobre los soportes de
plástico.
The first thing
we should do is cut the pieces of plastic or Rubber Eva, with the shapes we
want.
Then we expanded the putty on the plastic supports.
Then we expanded the putty on the plastic supports.

Esperamos que se seque, mínimo 24 horas y pintamos.
We hope it dries,
minimum 24 hours and we paint.

En mi caso he utilizado varios marrones y los he aplicado a
pincel.
El color a utilizar es independiente, ya que debemos darle
un aspecto de montaña, no de piedra, por lo que marrones sienas y sombras son
perfectos para este trabajo.
Para este trabajo he utilizado pinceles de brocha ancha, del
tipo pintor de muebles, y pinturas de la gama Acrylic Studio de Vallejo. Son
acrílicos en bote de 200ml, entre 4 y 5 € la botella.
In my case I used
several browns and applied them to a brush.
The color to use is independent, since we must give it a mountain look, not stone, so brown sienna and shadows are perfect for this job.
For this work I have used brushes of wide brush, of the type painter of furniture, and paintings of the range Acrylic Studio of Vallejo. They are acrylics in 200ml pot, between 4 and 5 € the bottle.

Los colores utilizados para este trabajo han sido:
- Sombra Natural nº
17, como color base.
- Siena Tostada nº 20, aplicado en pincel semi seco.
- Siena Natural nº 19, aplicado en pincel seco.
Obsérvese en la siguiente foto, como se ven los diferentes
tonos sobre la textura de la masilla acrílica.
The colors used
for this work have been:
- Natural shade nº 17, as base color.
- Siena Tostada nº 20, applied in a semi-dry brush.
- Siena Natural nº 19, applied in dry brush.
Observe in the following photo, how the different shades on the texture of the acrylic putty are seen.
- Natural shade nº 17, as base color.
- Siena Tostada nº 20, applied in a semi-dry brush.
- Siena Natural nº 19, applied in dry brush.
Observe in the following photo, how the different shades on the texture of the acrylic putty are seen.

Con el Amarillo de
Nápoles, nº 21, y con el mismo pincel de brocha ancha, aplico un pincel seco
para ir aclarando las colinas.
With the Yellow
of Naples, nº 21, and with the same brush of wide brush, I apply a dry brush to
clarify the hills.

Hago lo mismo con el Titanio Crudo, nº 42.
I do the same with the Crude Titanium, No. 42.

Y por último un pincel extremadamente seco con blanco puro.
En este caso he usado el blanco acrílico de Titan.
And finally an
extremely dry brush with pure white.
In this case I used Titan's white acrylic.
In this case I used Titan's white acrylic.

En la siguiente foto pueden verse el efecto que resulta de
aplicar los diferentes pinceles secos, durante el proceso final.
In the following
photo you can see the effect that results from applying the different dry
brushes, during the final process.

Las colinas ya pueden usarse para partidas.
The hills can now be used for games.

Pero he optado por aplicar algo de vegetación.
Como deben ser elementos 2D, sólo coloco microflock.
Primero he aplicado el Verde Verano, con el color más vivo.
But I have chosen
to apply some vegetation.
As they must be 2D elements, I only place microflock.
First I applied the Summer Green, with the most vivid color.
As they must be 2D elements, I only place microflock.
First I applied the Summer Green, with the most vivid color.

Y por último el color Verde Otoño, con un tono más “seco”.
And finally the
color Green Autumn, with a more "dry" tone.

Siento mucho el color de las fotografías, pero en la sala
donde realice las fotos, tenía una intensa luz natural y un buen número de
fluorescentes, obteniendo aleatoriamente una mezcla entre el tono cálido y
rojizo del sol y el verde del fluorescente.
I am very sorry
for the color of the photographs, but in the room where I made the photos, I
had an intense natural light and a good number of fluorescents, randomly
obtaining a mixture between the warm reddish tone of the sun and the
fluorescent green.
En las siguientes fotografías se puede observar como ha
quedado realmente el trabajo realizado.
In the following photographs you can see how the work has actually been done.


Salva Rosselló


No hay comentarios:
Publicar un comentario