

Painted Tanks 2GM - Part 6 - chipping
Como indicaba en el anterior artículo, los tanques ya estaban listos para poder jugar con ellos a Wargames de 2GM.
Como indicaba en el anterior artículo, los tanques ya estaban listos para poder jugar con ellos a Wargames de 2GM.
Pero todo aquel que desea personalizar su ejército, debe
pasar por un envejecimiento, un weathering, de los vehículos.
La primera técnica que he realizado es la realización de desconchones.
Esta técnica siempre se recomienda no hacerla en exceso, ya
que podemos estropear el trabajo general.
Pero en este caso he
optado por incrementar un poco más de lo básico, ya que deseo que tengan un
aspecto de tanques veteranos, de los que llevan meses sin pasar por “chapa y
pintura”, algo poco habitual y ciertamente falso, ya que el mantenimiento de
pintura de los tanques, de un bando y del otro, era fundamental para que el
óxido no debilitara el blindaje de los tanques. Cierto es que en los meses
finales de la guerra en Europa, los alemanes este mantenimiento no se
realizaba. La razón era que no tenían pintura para ello. Incluso las nuevas
unidades de tanques que salían de las fábricas, en los últimos meses, salían sólo
con la capa de minio rojo antioxidante y las tripulaciones, por lo general, no tenían
tiempo ni de buscar pintura para cubrir de pintura el tanque entregado… Pero
que en las ciudades, con los edificios en ruinas, ese color minio era el mejor
camuflaje que podían tener, ya que es muy similar al rojo de los ladrillos.
Como he ido indicando en los anteriores artículos, los
tanques realizados llevan los distintivos del escenario del oeste de Europa, en
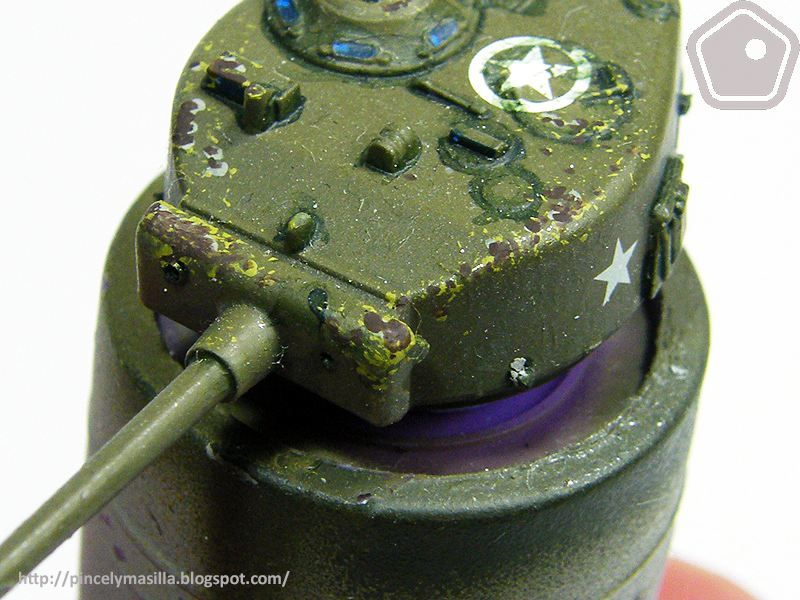
especial antes de llegar a Holanda. El distintivo de la estrella con círculo,
característico del escenario de Italia, desaparece completamente al iniciar el
avance sobre Holanda, dejando la estrella simple como distintivo de escenario
excepto en la parte superior en la torreta, en el caso de los norteamericanos,
o sobre el motor, en el caso de los británicos, que sigue llevando el circulo
alrededor, para el reconocimiento aéreo.
As indicated in the previous article, the tanks were already ready to play Wargames with 2GM.
But anyone who wants to customize their army, must go through an aging, weathering, of vehicles.
The first technique I have done is the realization of chipping.
This technique is always recommended not to do it in excess, since we can spoil the general work.But in this case I have chosen to increase a little more than the basics, since I want them to look like veteran tanks, which have been months without going through "sheet and paint", something unusual and certainly false, since the maintenance of tank paint, one side and the other, was essential for the rust not weaken the armor of the tanks. It is true that in the final months of the war in Europe, the Germans did not carry out this maintenance. The reason was that they did not have paint for it. Even the new tank units that left the factories, in recent months, came out only with the layer of red antioxidant minium and the crews, usually, did not even have time to look for paint to cover the delivered tank with paint ... But that in the cities, with the buildings in ruins, that color minio was the best camouflage that could have, since it is very similar to the red of the bricks.
As I have indicated in the previous articles, the tanks carried the hallmarks of the Western European stage, especially before arriving in Holland. The distinctive of the star with a circle, characteristic of the Italian scene, disappears completely when initiating the advance on Holland, leaving the simple star as a distinctive stage except at the top in the turret, in the case of the Americans, or on the engine, in the case of the British, which continues to take the circle around, for aerial reconnaissance.
Que es un desconchado / What is a Stratches
Este constante subir y bajar del tanque hace que poco a poco
se vaya eliminado las capas de pintura que puede llevar el tanque.
Es evidente que si el tanque es nuevo, sólo tenga la capa de
protección inicial y el color base.
En tanques que llevan más tiempo en combate, algo poco
habitual en los Sherman, esta capa de pintura podía ser de protección inicial,
más el color base, más tantas capas de pintura como veces haya pasado para su
repintado.
Para poder realizar la pintura desconchada tenemos que tener
en cuenta que se produce, básicamente, por tres casos en concreto, indicados de
mayor a menor intensidad.
- Por el desgaste de las botas de la tripulación. La tripulación
debe subir y bajar de los tanques, muchas veces de forma muy rápida y sin
miramientos, por lo que el recorrido que utilizan se desgasta de forma rápida. Si
miramos videos coloreados o los pocos en color que existen de la 2GM, podemos
ver que la tripulación de un Sherman sube
por el frontal del vehículo para poder acceder por la única escotilla de
entrada: la del comandante. En esas filmaciones se puede apreciar un desgaste
pronunciado en esta zona frontal.
- Por arañazos y rozaduras. Estos se producen porque el
tanque roza con edificios durante el combarte o cuando se están moviendo de un
punto a otro, entre otros tanques cuando se está poniendo en “formación” para
su descanso, o pro el choque con arboles y otros elementos naturales. En
escalas superiores a 20mm tendría que añadir a estas rozaduras, la trasferencia
con lo que se ha impactado, por lo que tendría que añadir colores como blanco,
rojo, verde u otro tono que nosotros consideremos adecuado. A esta escala,
mejor que no, ya que puede quedar “raro”.
- Por el combustible. Al llenar los depósitos de
combustible, solía derramarse un poco del mismo (que ya lo representaremos un poco
más adelante). El combustible es un disolvente de la pintura que usaban por lo
que más pronto que tarde esta se reblandecía y saltaba, capa a capa, de la zona
cercana a los tapones de llenado de combustible.
This constant rise and fall of the tank causes the layers of paint that the tank can carry to be removed little by little.
It is evident that if the tank is new, only have the initial protection layer and the base color.
In tanks that have been in combat for longer, something unusual in the Shermans, this layer of paint could be the initial protection, plus the base color, plus as many layers of paint as there have been times for repainting.
In
order to make the peeling paint we have to take into account that it is
produced, basically, by three specific cases, indicated from higher to
lower intensity.- Because of the wear of the crew's boots. The crew must go up and down the tanks, many times very quickly and unceremoniously, so the route they use is worn out quickly. If
we look at colored videos or the few color ones that exist in the 2GM,
we can see that the crew of a Sherman climbs up the front of the vehicle
to be accessed by the only entrance hatch: that of the commander. In those films you can see a pronounced wear in this frontal area.- Scratches and scratches. These
occur because the tank rubs against buildings during the warp or when
they are moving from one point to another, among other tanks when it is
being put into "formation" for rest, or because of the collision with
trees and other natural elements. In
scales greater than 20mm, I would have to add to these chafing, the
transference with what has been impacted, so I would have to add colors
like white, red, green or another tone that we consider appropriate. At this scale, better than not, because it can be "weird".- For the fuel. When filling the fuel tanks, it used to spill some of it (which we will represent a little later). The
fuel is a solvent for the paint they used, so sooner rather than later
it softened and leapt, layer by layer, from the area near the fuel
filler plugs.
Pintura base al descubierto / Base paint exposed
En el caso de los tanques americanos, no he conseguido saber
si ponían el color rojo del minio o si lo protegían con otro color, por lo que
he optado por usar un color claro, para resaltar el efecto del desgaste.
Por ello, como color base de los desconchones, he optado por
el Amarillo oscuro (Model Color 978 – 116), en algunos botes antiguos esta
nombrado como Amarillo Camuflaje, ya que tiene un ligero tono verdoso, que considero
interesante para el color verde de los Sherman.
Para aplicar este color usaré la técnica de la esponja, llamada
más correctamente técnica de estarcido.
Para ello mojo la punta de la esponja con el color.
In the case of American tanks, I did not know if they put the red color of the minium or if they protected it with another color, so I chose to use a light color, to highlight the effect of wear.
Therefore, as the base color of the chips, I opted for the Dark Yellow (Model Color 978 - 116), in some old boats is named as Yellow Camouflage, since it has a slight greenish tone, which I consider interesting for the green color of the Shermans.
To apply this color I will use the sponge technique, more correctly called stenciling technique.
To do this, wet the tip of the sponge with the color.

Retiro el exceso presionando la esponja sobre un papel, de
forma reiterada, hasta que el resultado de esta presión es el que deseamos
conseguir.
I remove the excess pressing the sponge on a paper, repeatedly, until the result of this pressure is what we want to achieve.
I remove the excess pressing the sponge on a paper, repeatedly, until the result of this pressure is what we want to achieve.

Y presionamos la parte con pintura de la esponja sobre
nuestra maqueta.
And we press the part with paint of the sponge on our model.
And we press the part with paint of the sponge on our model.

Si la espuma es muy ancha o grande, podemos recortar con
unas tijeras la esponja sobrante, hasta tener la zona a mojar con pintura, del
tamaño adecuado para nuestro trabajo.
Aplicaremos la puntura con la
esponja a base de punteados, especialmente en aquellos sitios más proclives al
desgaste (aristas, escotillas, mamparas, etc).
Donde más pronunciado suelen ser
los desgastes es justo en el borde de las aristas
Después marcar
los bordes de los desconchones, parcialmente, sólo en los bordes superiores,
dándoles profundidad.
El resultado es interesante.
If the foam is very wide or large, we can cut with scissors the excess sponge, until the area to be wet with paint, the right size for our work.
We will apply the puncture with the sponge based dotted, especially in those sites more prone to wear (edges, hatches, screens, etc).
Where wear is most pronounced is just at the edge of the edges
Then mark the edges of the chips, partially, only at the top edges, giving them depth.
The result is interesting.

En este punto, algunos pintores incrementan el efecto usando
el pincel, para hacer áreas más grandes, o unificando manchitas, para convertirlas
en una más grande.
Francamente, eso a escalas como 1/48, 1/59 (28mm) y
especialmente 1/35, es muy aconsejable.
Para 15mm considero que las manchas conseguidas con la
esponja pueden ser incluso extremadamente grandes.
Pero eso son consideraciones y gustos de cada pintor.
Para imitar rozaduras, usaré un pincel fino y haré líneas finas y cortas en los laterales
del tanque. Y sólo en los laterales.
El resultado puede parecer muy extremo, pero como se ira viendo,
poco a poco irá adecuándose a lo que queremos.
At this point, some painters increase the effect by using the brush, to make larger areas, or by unifying spots, to turn them into a larger one.
Frankly, that at scales like 1/48, 1/59 (28mm) and especially 1/35, is very advisable.
For 15mm I consider that the spots obtained with the sponge can be even extremely large.
But that are considerations and tastes of each painter.
To imitate chafing, I will use a fine brush and make thin, short lines on the sides of the tank. And only on the sides.
The result may seem very extreme, but as it will be seen, little by little it will adapt to what we want.


Pintura intermedio al
descubierto / Intermediate paint exposed
Después de este color base, podemos aplicar un color claro
diferente, para dar un poco de sensación de profundidad.
Para ello he usado el Oliva Dorado (Model Color 857 – 079),
que es el color que aconsejan varios pintores para el color de los Shermans, y
el Gris Cemento (Model Air 045), que es otro de los colores también más
recomendados. Estos colores los he usado aleatoriamente en los tanques, un solo
color por tanque, para ver cual es el más idoneo, para futuros vehículos, y
considero que el gris se adapta más a lo que busco.
Unos pocos pintores recomiendan, sobre el verde USA de los Shermans,
usar Arena Iraquí, pero este es más adecuado para los carros alemanes;
visualmente para mí lo veo demasiado extremo y mucho más claro que el Amarillo
Oscuro de base.
Estos
colores los aplico esclusivamente con un pincel fino, poniendo poca pintura en
la punta del mismo.
Estos los
realizaremos con la técnica de punteado, un mapping muy conveniente para esta
escala, realizando pequeños punteados en las zonas que consideremos de menor
desgaste y, especialmente cuanto más alejado de la arista.
After this base color, we can apply a different light color, to give a bit of depth sensation.For this I used the Golden Olive (Model Color 857 - 079), which is the color recommended by several painters for the color of Shermans, and Gray Cement (Model Air 045), which is another of the most recommended colors. I used these colors randomly in the tanks, only one color per tank, to see which one is the most suitable, for future vehicles, and I consider that the gray is more suited to what I am looking for.A few painters recommend, on the USA green of the Shermans, to use Iraqi Sand, but this one is more suitable for the German cars; visually for me I see it too extreme and much clearer than the base Dark Yellow.These colors I apply them exclusively with a fine brush, putting little paint on the tip of it.These will be done with the technique of dotted, a very convenient mapping for this scale, making small points in the areas that we consider less wear and tear, especially the further away from the edge.

Este primer tanque está realizado el punteado con Oliva
dorado.
This first tank is made dotted with golden olive.


Y el segundo tanque con Gris Cemento.
And the second tank with Gray Cement.


No debemos preocuparnos si al final de esta fase las manchas
quedan raras y poco realistas, ya que es en la siguiente fase en la que veremos
el resultado correcto al final.
We should not worry if at the end of this phase the stains are rare and unrealistic, since it is in the next phase that we will see the correct result at the end.
Metal al descubierto / Metal exposed
Una de las características de los desconchones es que el
metal termina por quedar al descubierto.
Pero como no hay rozamiento constante, este metal
rápidamente queda cubierto por una pátina de óxido antiguo.
Esto lo representaremos aplicando el color Óxido Oscuro
(Panzer Aces 302).
Para ello aplico esta pintura ligeramente rebajada con
diluyente en el centro de las manchas aplicadas con el Amarillo Oscuro.
One of the characteristics of chipping is that the metal ends up being exposed.
But as there is no constant friction, this metal is quickly covered by an old oxide patina.
This will be represented by applying the color Dark Oxide (Panzer Aces 302).
For this I apply this paint slightly recessed with thinner in the center of the spots applied with the Dark Yellow.

Con ello consigo dar un total realismo a los desconchones y
eliminar el tono de manchas amarillentas que aparentemente afean el trabajo.
With this I can give a total realism to the chipping and eliminate the tone of yellowish spots that apparently make the job look bad.

El Amarillo Oscuro no debemos cubrirlo completamente, sino
que debe estar muy presente y el color
oscuro sólo en el centro.
Sé que me repito, pero para conseguir el efecto de
desconchones, sobre todo a 15mm, esto es muy importante.
El primer tanque se ve de esta forma.
The Dark Yellow should not be completely covered, but should be very present and the dark color only in the center.I know I repeat, but to get the effect of chipping, especially at 15mm, this is very important.
The first tank looks like this.


Pero tampoco es necesario poner este color oscuro en todas
las manchas amarillas. Recordad que el amarillo representa el color que hay
debajo del verde, por lo que en manchas pequeñas, no se debe aplicar el color
oscuro.
But neither is it necessary to put this dark color on all the yellow spots. Remember that yellow represents the color below the green, so in small spots, the dark color should not be applied.

El segundo tanque queda al final así.
The second tank is at the end like this.

Hay que tener en cuenta que los distintivos, aunque nosotros
los ponemos con calcas, en la realidad es pintura blanca, por lo que también
son propensos a desconcharse.
Keep in mind that the badges, although we put them with decals, in reality is white paint, so they are also prone to peeling.

Y ya tenemos el primer efecto del envejecimiento, del
weathering, ya terminado.
And we already have the first effect of aging, of weathering, already finished.


Como se puede apreciar, mis tanques representan que han
tenido “mucha guerra”. Aunque en la realidad ni por asomo terminaban así. De lo
contrario, la tripulación es propensa a un arresto seguro.
Pero es exactamente lo que yo quiero representar.
As you can see, my tanks represent that they have had "a lot of war". Although in reality it did not end like this. Otherwise, the crew is prone to secure arrest.
But it is exactly what I want to represent.


Para seguir el trabajo, ver:
To continue the work, see:
- Parte 3ª - Pintado
de Tanquistas/Painting of Tankers.
- Parte 4ª - Calcomanías/Decal.
-
Parte 5ª - Perfilados/Profiled.
-
Parte 6ª - Desconchones/scratches.
-
Parte 7ª - Aguadas/Watery.
-
Parte 8ª - Suciedad
Acumulada/Accumulated Dirt.
-
Parte 9ª - Aceite,
Combustible y Grasa/Oil, fuel and grease
-
Parte 10ª - Orugas/Tracks
-
Parte 11ª - Barro/Mud
- Parte 12ª – Anteans
y Final/Antennas & end
Salva Rosselló


No hay comentarios:
Publicar un comentario